理论基础
info
对于一个纯粹的硬件算法模块, 如果验证工程师得到的是 MATLAB/Simulink 模块,那么他在前期验证过程中就会有需求将算法模块置入UVM环境中进行联合仿真。在多数情况下,验证工程师应避免对算法模型进 行二次转换为C/C++模型或 SV 模型,因为这不但意味着额外的工作量,而且在模型转换过程中可能出现失误。
- MATLAB和Simulink 模型在MATLAB软件中独立运行,而与UVM 环境并行运行
- UVM与MATLAB之间并没有直接的库实现通信, 但可以使用C接口在它们之间扮演“中转站”的角色,因为SV与C的DPI接口、MATLAB 提供的C库可以直接控制MATLAB的执行引擎
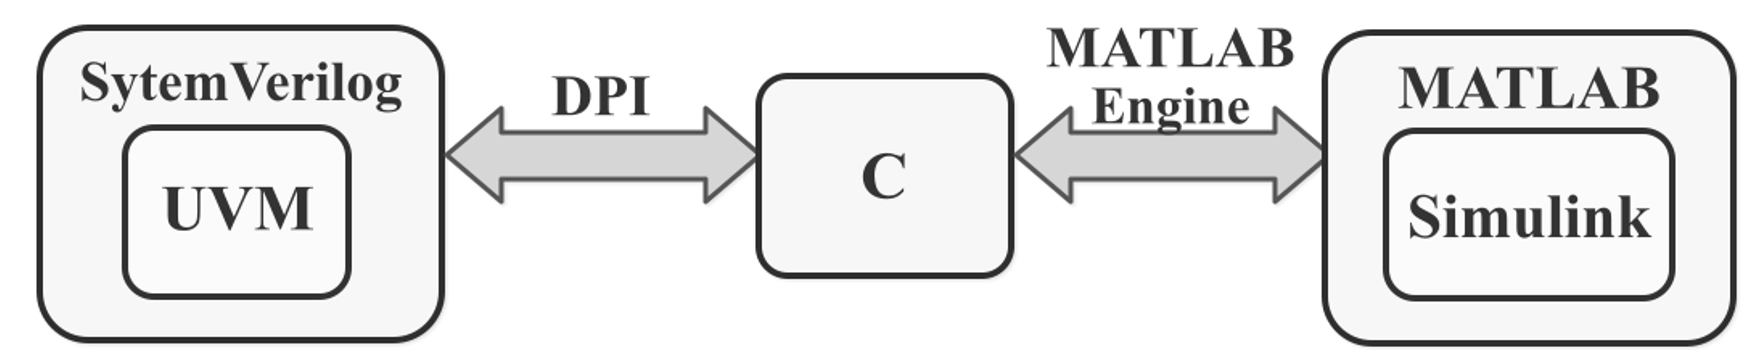
info
本质还是C和sv之间通过DPI来进行交互。由于MATLAB提供C的接口库,用户可以通过调用C函数来触发和结束MATLAB、传递和得到数据、向MATLAB发送其他控制命令。
matlab提供的C API包括如下,这些指令在matlab的安装头文件engine.h中
- 打开和关闭MATLAB的执行引擎
- 传递和得到变量数据
- 向Matlab命令窗口传递指令
我们要用c调用matlab,最好查看matlab的例子,为我们的设计提供参考:
c头文件存放的目录:$MATLAB/software/extern/include
c调用matalb的例子:$MATLAB/extem/examples/eng_mat/engdemo.c
具体实现流程
Makefile编译选项的问题
info
由于编译头文件中包含matlab的一些头文件以及一些链接库,初始条件下很难自己完成gcc编译和链接的参数。因此借助mex工具查看gcc的编译指令,然后将其拆分后添加到Makefile
mex编译$MATLAB/extem/examples/eng_mat/engdemo.c,这里的-V会在终端输出具体的过程
1
2
| cd /opt/matlab/R2025b/extern/examples/eng_mat
mex -client engine engdemo.c -V
|
此时的终端输出如下,我们得到了具体的gcc指令,包括编译和链接两个阶段
1
2
3
4
| Building with 'gcc'.
/usr/bin/gcc -c -DMATLAB_DEFAULT_RELEASE=R2017b -DUSE_MEX_CMD -D_GNU_SOURCE -DMATLAB_MEX_FILE -I"/opt/matlab/R2025b/extern/include" -I"/opt/matlab/R2025b/simulink/include" -fexceptions -fPIC -fno-omit-frame-pointer -pthread -fwrapv -O2 -DNDEBUG -fno-predictive-commoning "/opt/matlab/R2025b/extern/examples/eng_mat/engdemo.c" -o /tmp/mex_137271009490474_235306/engdemo.o
/usr/bin/gcc -pthread -Wl,--no-undefined -Wl,-rpath-link,/opt/matlab/R2025b/bin/glnxa64 -O /tmp/mex_137271009490474_235306/engdemo.o "/opt/matlab/R2025b/sys/os/glnxa64/orig/libstdc++.so.6" $MW_GLIBC_SHIM -L"/opt/matlab/R2025b/bin/glnxa64" -lmx -lmex -lmat -lm -lstdc++ -leng -z noexecstack -o engdemo
MEX completed successfully.
|
因此保持上述参数不变,修改到我们编译uvm的Makefile中
1
2
3
4
5
6
7
8
9
10
11
12
13
14
15
16
17
18
19
20
21
22
23
24
25
26
27
28
29
30
31
32
| elaboration:
${UVM_VCS_BASE_CMD} \
-CC -DMATLAB_DEFAULT_RELEASE=R2017b \
-CC -DUSE_MEX_CMD \
-CC -D_GNU_SOURCE \
-CC -DMATLAB_MEX_FILE \
-CC -I/opt/matlab/R2025b/extern/include \
-CC -I/opt/matlab/R2025b/simulink/include \
-CC -I${ROOT_PATH}/../dv/c_source \
-CC -I${ROOT_PATH} \
-CC -fexceptions \
-CC -fPIC \
-CC -fno-omit-frame-pointer \
-CC -pthread \
-CC -fwrapv \
-CC -O2 \
-CC -DNDEBUG \
-CC -fno-predictive-commoning \
-CC -pthread \
-CC -Wl,--no-undefined \
-CC -Wl,-rpath-link,/opt/matlab/R2025b/bin/glnxa64 \
-CC -z \
-CC noexecstack \
-LDFLAGS /opt/matlab/R2025b/sys/os/glnxa64/orig/libstdc++.so.6 \
-LDFLAGS -L/opt/matlab/R2025b/bin/glnxa64 \
-LDFLAGS -lmx \
-LDFLAGS -lmex \
-LDFLAGS -lmat \
-LDFLAGS -lm \
-LDFLAGS -lstdc++ \
-LDFLAGS -leng \
${ROOT_PATH}/../dv/c_source/polar_matlab_model.c
|
attention
-CC是传递编译选项,-LDFLAGS传递链接选项,必须要分清楚
c语言程序实现参考
C语言添加engine.h头文件,并在sv中import
1
| import "DPI-C" function void engOpen();
|
matlab的回调函数如下所示,这里的代码例子是调用polar码编码的matlab脚本
1
2
3
4
5
6
7
8
9
10
11
12
13
14
15
16
17
18
19
20
21
22
23
24
25
26
27
28
29
30
31
32
33
34
35
36
37
38
39
40
41
42
43
44
45
46
47
48
49
50
51
52
53
54
55
56
57
58
59
60
61
62
63
64
65
66
67
68
69
70
71
72
73
74
75
76
77
78
| int polar_matlab_call(int K, double *bin_array, double *encoded_result) {
Engine *ep = NULL;
mxArray *input_K = NULL, *input_array = NULL, *output = NULL;
int N = 1024;
printf("=== Polar编码调用程序 ===\n\n");
printf("\n2. 启动MATLAB引擎...\n");
ep = engOpen("matlab -nosplash -nodesktop");
if (ep == NULL) {
fprintf(stderr, "错误: 无法启动MATLAB引擎!\n");
free(bin_array);
return 1;
}
printf(" MATLAB引擎启动成功\n");
printf("\n3. 设置MATLAB工作目录...\n");
engEvalString(ep, "try, cd('/home/icer/workspace/git_prj/huawei-cup/matlab'); catch, end");
printf("\n4. 准备输入参数...\n");
input_K = mxCreateDoubleScalar((double)K);
input_array = mxCreateDoubleMatrix(K, 1, mxREAL);
memcpy(mxGetPr(input_array), bin_array, K * sizeof(double));
printf("\n5. 传递参数到MATLAB...\n");
engPutVariable(ep, "c_K", input_K);
engPutVariable(ep, "c_bin_array", input_array);
printf("\n6. 执行Polar编码...\n");
if (engEvalString(ep, "c_result = polar_encode_func(c_K, c_bin_array);") != 0) {
fprintf(stderr, "错误: Polar编码执行失败!\n");
mxDestroyArray(input_K);
mxDestroyArray(input_array);
engClose(ep);
free(bin_array);
return 1;
}
printf("\n7. 获取编码结果...\n");
output = engGetVariable(ep, "c_result");
if (output != NULL) {
mwSize rows = mxGetM(output);
mwSize cols = mxGetN(output);
int result_length = rows * cols;
memcpy(encoded_result, mxGetPr(output), result_length * sizeof(double));
} else {
printf("警告: 未获取到编码结果\n");
}
printf("\n8. 清理资源...\n");
mxDestroyArray(input_K);
mxDestroyArray(input_array);
mxDestroyArray(output);
engClose(ep);
printf("\n程序执行完成!\n");
return 0;
}
|
对于sv中调用的polar_model,参考代码如下,主要实现的流程是读取sv传过来的参数,解析为matlab所需要的参数值,然后通过matlab的调用函数计算编码结果,最后返回再次进行封装,方便后续sv获取结果
1
2
3
4
5
6
7
8
9
10
11
12
13
14
15
16
17
18
19
20
21
22
23
24
25
26
27
28
29
30
31
32
33
34
35
36
37
38
39
40
41
42
43
44
45
46
47
48
49
50
51
52
53
54
55
56
57
58
59
60
61
| uvm_polar_matlab_model(int sel, const svLogicVecVal *polar_in_data, svLogicVecVal *polar_out_data){
int N = 1024;
int K;
int polar_in_array[384/32];
int polar_out_array[1024/32];
double u[384];
double encoded_double[1024];
int encoded[1024];
if(sel == 0){
printf("the polar input rate is 1/4\n");
K = 256;
}
else {
printf("the polar input rate is 3/8\n");
K = 384;
}
int num_elements = 384 / 32;
for(int i = 0; i < num_elements; i++){
polar_in_array[i] = polar_in_data[i].aval;
}
for(int i = 0; i < 384/32; i++){
for(int j = 0; j < 32; j++){
u[i*32 + j] = (double)((polar_in_array[i] >> j) & 0x1);
}
}
printf("\n");
polar_matlab_call(K, u, encoded_double);
for (int i = 0; i < N; i++){
encoded[i] = (int)encoded_double[i];
}
printf("\n ");
for(int i = 0; i < 1024/32; i++){
polar_out_array[i] = 0;
for(int j = 0; j < 32; j++){
polar_out_array[i] += encoded[1023- i*32 - j] << (31 - j);
}
printf("polar_out_array[%d] = %x\n", i, polar_out_array[i]);
}
for(int i = 0; i < 1024/32; i++){
polar_out_data[i].aval = polar_out_array[1024/32-i-1];
polar_out_data[i].bval = 0;
}
}
|
info
再次补充说明一下数据类型:svLogicVecVal *对应的为logic类型